Having an issue with your Rinnai water heater displaying error code 12?
This error indicates a problem with the unit’s fan or airflow—perhaps a clogged air intake, dusty fan blades, or even a failed fan motor.
It points to relatively simple airflow obstructions or fan issues that can often be fixed without replacing major components. In this guide, we’ll discuss basic troubleshooting any DIYer can tackle to clear error code 12.
We’ll cover checking for clogs, cleaning fan blades, testing the fan motor, and replacing damaged parts.
Rinnai Error Code 12 Indicators
Here are a few telltale signs to look for when the Rinnai error code 12 pops up:
Flashing Code 12 Signals Airflow Issue
The Rinnai control panel displaying a flashing 12 code indicates an airflow obstruction or fan problem preventing water heating. This should prompt close inspection of ventilation and fans.
No Hot Water Due To Restricted Airflow
Restricted airflow is a common cause of a Rinnai heater providing little or intermittent hot water. A clogged air filter, debris blocking the PVC intake vent, or broken fan can choke airflow, preventing the burners from igniting correctly.
Odd Noises from Strained Fan
If you hear rattling, grinding, or humming sounds from your water heater, something’s off. Maybe dust has built up and is clogging the fan blades, so the motor strains to spin. Or debris could be stuck in the fan. Either way – the airflow suffocates. Strange ticking noises could also mean an issue with gas flow to the struggling burners.
Gas Odor Signals Danger
Catching a whiff of natural gas gives a clear warning – gas is escaping untreated around your Rinnai unit. The inactive burners fail to ignite it, enabling vapor buildup.
Threats of explosion and carbon monoxide poisoning make this a pressing safety issue that requires swift response. Shut off the unit and contact Rinnai support for the next steps.
Understanding Error Code 12: Root Causes
When error 12 pops up, it generally boils down to either a fuel supply issue or an airflow issue that prevents water heating. Let’s unpack some specifics.
1. Gas Related Issues
Error code 12 basically means there’s not enough gas or air for the burners to ignite properly.
On the gas supply side, loose pipe fittings, incorrect line pressure, or using the wrong fuel type can starve the flames. Airflow issues like a dusty filter or blocked vents have a similar effect, choking off the oxygen.
The burners won’t light up to heat the water when the igniters kick in without adequate fuel and air to sustain combustion. Hence, error code 12 frustrating your shower plans.
2. Combustion Related Issues
Error code 12 signaling that no hot water on your Rinnai unit may also relate to combustion functionality beyond fuel or airflow supply issues.
Specifically, clogged burners blocked by built-up debris can directly inhibit ignition. Faulty spark igniters can also fail to reach sufficient heating capacity to light the gas as intended. Or the blower fans may not be pulling adequate air volume into the combustion chamber for complete fuel burning.
3. Sensor Related Issues
Sensor issues can also shut down your Rinnai’s heating and display error code 12, disrupting your hot water. For example, flame sensors verify burner ignition but get coated in grime over time, preventing proper detection.
Similarly, faulty water flow sensors might not correctly call for heat when you need it. Losing electrical connections disrupts the transmission of any sensor signals.
When these vital updates about burner status or heating demand can’t get through properly, the unit assumes something is wrong and halts operation.

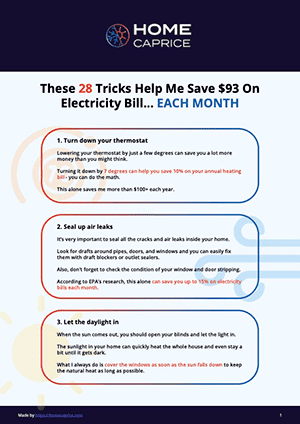
Download this FREE cheat sheet to find 28 tricks that can help you save on your electricity and heating bill each month.
Click here to get a FREE Cheat-SheetTroubleshooting Steps for Resolving Error Code 12
Step 1: Preliminary Checks
First, we must run through some basic checks before inspecting the unit up close.
Verify the Water and Fuel Supply
Check that the water lines are turned on and faucets are open – cold water should flow freely even if hot water isn’t working.
Make sure to check that the gas supply valve is fully open, too. Use a pressure gauge to test the gas pressure head-on, verifying it’s at the needed spec.
Nearby gas line work can sometimes inadvertently reduce pressure and trigger error code 12.
Inspect The Temperature Setting
Check out the temperature setting on the control panel. Was it accidentally lowered or switched into vacation mode?
Try cycling the dial through its range—low to high and back again. This reset can clear the error if caused by incorrect settings rather than mechanical problems.
Check for External Damage
Walk around the unit, checking for broken, bent, or damaged parts. Rodents nesting in vent pipes or debris in the intakes can quickly cause system errors.
These preliminary checks help narrow down potential causes of error 12 before troubleshooting the unit’s internal components.
Step 2: Basic Troubleshooting
Double Check Gas Supply and Valves
Now that we’ve verified the external factors are all working properly let’s take a closer look at the gas supply flow. First, validate that the incoming gas pressure matches what’s specified on the unit’s rating plate using a manometer.
Pressure that’s too high or low could be triggering the error code. Also, check that all manual gas valves leading to the unit are fully open. Even partially closed valves can restrict flow enough to cause problems.
Lastly, bleed the gas lines to remove trapped air pockets that could be throwing off pressure readings.
Reset Error Codes
With the supply verified, reset the control board to clear any transient error codes. To reset, press and hold the “On/Off” button for 5 seconds until code 12 disappears. The unit will cycle through diagnostics and not trip code 12 again now that the supply is stabilized.
Check and Clean Debris
Remove the front panel and thoroughly inspect the unit’s interior for any signs of debris, dirt buildup, or obstruction that could hinder airflow or gas supply.
Blow off any dust or debris with compressed air or gently brush it off. Pay extra attention to the blower fan, gas valve, and burners.
Inspect the Gas Valve Condition
Check the gas valves and connecting pipes for damage or leaks. If you detect a leak, replace the valve immediately to ensure safety. Tighten any loose fittings or fasteners along the supply line to the appropriate torque settings.
Step 3: Advanced Troubleshooting
At this stage, the problem requires advanced diagnostics and troubleshooting, best carried out by a trained Rinnai technician.
Further tinkering without expertise risks compounding issues or voiding guarantees. Here are professional-grade steps a seasoned pro would execute:
Inspecting Flame Rods & Wiring
A professional removes and carefully inspects the flame rod and its wiring. They check for small dirt buildup that might affect burner detection, as well as heat damage that could have weakened connections. This guides rod cleaning or replacement.
Comprehensive Sensor Testing
Technicians use advanced tools to test each sensor and validate they are transmitting proper data to control modules.
They check ignition sequences as well for any faults. This ensures sensors or software logic issues are truly ruled out before assuming replacement parts are needed.
It might be tempting to keep trying to fix the issue yourself, but complex heating systems have subtleties that are tough to spot without the proper training.
Instead of getting frustrated or risking mistakes, it’s best to work with a certified Rinnai professional at this point.
When to Call Professional Service
DIY troubleshooting goes a long way, but certain situations demand professional expertise:
- If gas leaks or severe damage is spotted, shut down the unit immediately and schedule certified service. Don’t try to fix gas pipes on your own.
- If error 12 persists after comprehensive DIY steps, the underlying issues probably need advanced diagnostics tools and technical knowledge. Any complex disassembly also requires certified technicians to retain your warranty coverage.
- If you don’t feel comfortable or sure about working with electricity, gas lines, ignition sequences, or sensors, it’s time to call a professional. Don’t take shortcuts with heating systems.
Locating Certified Rinnai Technicians
Seeking professional service starts with finding certified technicians familiar with Rinnai systems. Check Rinnai’s contractor locator maps to identify the highest-tier ProCircle professionals in your area.
ProCircle membership signifies advanced Rinnai training and expertise.
Visit this page for quick access to deals from contractors through a strict verification process. You can connect with top-rated local technicians and quickly request project estimates.
Knowing when to tap a professional and where to find certified experts ensures error 12 gets resolved promptly and safely.
Preventing Future Error Code 12 Occurrences
Resolving the immediate code is a priority, but we also want to minimize repeat issues. Here are pro tips to avoid recurring error code 12:
1. Preserve Proper Airflow Clearances
Ensure the area around the installed unit meets the minimum clearance requirements outlined in Rinnai manuals.
Blocking ventilation openings or adding enclosures limits air supply to the fan and burners, leading back to code 12.
2. Schedule Annual Maintenance Checks
Routine maintenance tunes up key components and detects issues before they cascade into shutdown errors.
Have a Rinnai technician perform an annual system check, entailing air filter replacement, burner inspections, gasket checks, and sensor testing.
3. Keep Air Paths Obstruction-Free
Ensure the exterior PVC air intake and exhaust terminal remain debris and snow-free year-round.
Clogged pathways are prime culprits of limited airflow and subsequent fault codes. Periodically inspect terminals and remove any buildup.
4. Consider Service Plans
Preventative maintenance plans provide regular system analysis, cleaning, and discounted rates for any repairs needed over time.
Service plans cut expenses and minimize the chance of recurring error 12 encounters. But when issues pop up, use the outlined troubleshooting tips and contact certified support to resolve problems promptly.


Download this FREE cheat sheet to find 28 tricks that can help you save on your electricity and heating bill each month.
Click here to get a FREE Cheat-Sheet
![Propane Furnace REAL Cost [Breakdown]](https://homecaprice.com/wp-content/uploads/propane-furnace-cost_URL-768x512.png)
